![]() 17 Nov 17 -
Added photos more photographs and
details of the power train installation.
17 Nov 17 -
Added photos more photographs and
details of the power train installation.
![]()


| Some photographs taken at Longham Reservoir courtesy of Alan Butterworth |
 |
 |
| Slow fly-by | Dragging her heels on landing |


I have converted this kit from i.c. to electric power. My model's specification is:
| N� of launches / Time | 81 | 10 hrs 14 mins | includes flights in all configurations | |||||||
| Wingspan | 73 in | 1.85 m | ||||||||
| Wing Area | 765 in� | 49.4 dm� | ||||||||
| Geared Brushed / NiCd | Direct Drive Brushed / NiCd | Direct Drive Brushed / LiPo | Direct Drive Brushless / LiPo | |||||||
| Flying Weight | 6 lb 12 oz | 3.05 kg |
7 lb 13 oz or 9 lb 2 oz |
3.55 kg | 7 lb 10 oz | 3.46 kg | Wheels | 8 lb 4.7 oz | 3.31 kg | |
| Floats | 8 lb 7.7 oz | 3.85 kg | ||||||||
| Wing Loading | 20.3 oz/ft� | 62 g/dm� |
23.5 or 27.5 oz/ft� |
71.8 g/dm� | 23.0 oz/ft� | 70.1 g/dm� | Wheels | 22.0 oz/ft� | 67.0 g/dm� | |
| Floats | 2.5. oz/ft� | 77.9 g/dm� | ||||||||
| Wing Cube Loading | 8.8 - Between Trainer and Aerobatic groups |
10.2
or 11.9 Between Aerobatic and Scale groups |
10 - Aerobatic |
Wheels |
9.5 - Aerobatic | |||||
| Floats | 11.1 - between Aerobatic& Scale | |||||||||
| Motor | Cermark CEM2008 | Mega S9 | Mega S9 | Turnigy 4260-600 Brushless outrunner | ||||||
| Gearbox | Modelair-Tech H-500 with 2.4:1 ratio. | Direct Drive | Direct Drive | Direct Drive | ||||||
| Propeller | Electric Series Master Airscrew 13" x 8" or 12" x 8" Wooden. | APC 13" x 7" | APC 13" x 7" | APC 13" x 7" | ||||||
| Batteries | 12 Sanyo RC-2000 | 16 or 22 Sanyo RC-2000 or 16 Sanyo RC-3300HV cells |
2x 5S 3700mAh 20C
Shark Power as 5S2P LiPo (7400mAh effective) or |
|||||||
| Speed Controller | Sung-Ji HGS-50 - 50A - 8 to 24 cells - Brake | Turnigy Plush 60A - 2-6S LiPo - 3A BEC - Brake | ||||||||
| Receiver | Futaba FP-R116FB - 6ch - PPM - 35 MHz | Spectrum AR6210 - 6ch DSMX - 2.4GHz - Internal and remote receiver | ||||||||
| Receiver Battery | 4-cell 1100 mAh | N/A | ||||||||
| Servos / controls | Ailerons | 2x Fleet FPS-18 | ||||||||
| Elevator | Multiplex MS-4X | |||||||||
| Rudder | Multiplex MS-4X | |||||||||
| Landing Light | 2 x 3W Cree LEDs running on dedicated 1S 800mAh LiPo pack and operated using a Turnigy Receiver Controlled Switch | |||||||||
| Optional | Camera Shutter - Conrad ES-05 | |||||||||
| Tow Release - Fleet FPS-20 | ||||||||||
| Water rudders for floats - 2x HobbyKing HK-933MG | ||||||||||
| Static performance |
5900 RPM at
propeller drawing 32A. Hear it Roar |
7000 RPM at 18.6V, drawing 21.8A after 30s on 16 cells = 405W or 52W/lb Never measured on 22 cells. | 6900 RPM at 18.5V, drawing 23.2A after 30s on 2 x 5S1P 20C 3700mAh LiPo = 430W or | Spins an APC 13" x 7" propeller at 8340 RPM on 17.42V, drawing 31.58A after 30s using 2 x 5S1P 20C 3700mAh Shark Power LiPo = 500W. This is 69 W/lb with wheels and 59 W/lb on floats. | ||||||
| Flight performance | Climb out about 20�. Maintains level flight at 1/2 throttle. Loops from level flight at 3/4 throttle. I currently have the timer on my TX set at 10 minutes which allows for a few loops. However, this doesn't really leave enough for a go around - I think I'll reduce it to 8 minutes for safety. Read the full flight test report. | Climb out about 20� on 16 cells, 30� on 22 cells. More to follow. | Very similar to the Direct Drive Brushed & NiCd set-up but the slightly lighter weight and increased power is noticeable. The flying duration available now is pretty awesome with a nominal full throttle motor run of 19 minutes and much less than full power needed to maintain height. |
It's been a long time since the Cub flew under the last power trains,
however, I think the extra power is noticeable and a 30� degree climb is
easily sustainable. Loops from level flight are smooth and open.
Over 2 flights the flight average power was measured
as 190W (more aerobatic) and 150W (see below for more).. On floats the Cub is still perfectly balanced with no real vices. It almost certainly requires a little more power to maintain height but it seems not much. The approach angle is very similar due to the increased drag but also increased weight. You can slowly pull back until the rear of the floats touch the water for really smooth landings. I haven't tried aerobatics and don't think I will as I think they would look a little odd. |
||||||
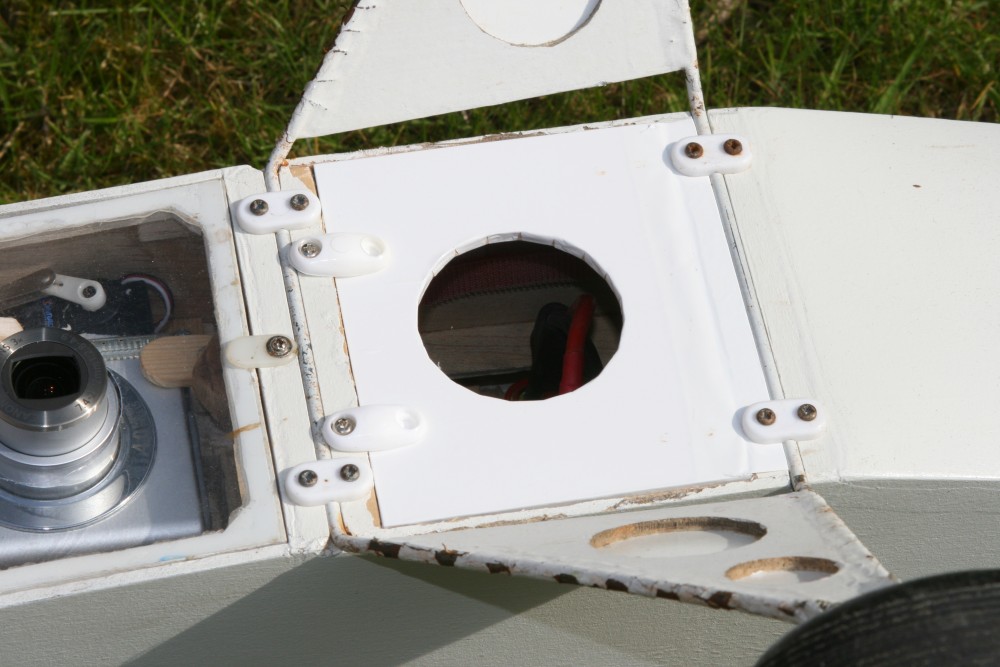
17 Nov 17: To assist anyone thinking of converting a Flair Cub to electric, or building one as electric, I've added a number of photographs to assist. I made the top front cowl a little wide at the front so it leaves a gap about 5 mm tall at the centre; this lets some air in past the motor, through the battery bay and out of the hole in my battery hatch between the main undercarriage legs. As I often fly my Cub from water the hole in the battery hatch has a piece of clear plastic 'pop' bottle fitted to it. The hatch is kept closed by 2 flat undercarriage plates screwed the rear main undercarriage hardwood rail; miine are a little wide so trimmed slightly to clear the hatch when swung to the rear. There is also a small slot cut in the rear of the hatch to allow the servo lead for the water rudders to exit the fuselage when the floats are fitted.
The batteries are a close fit but only because I have 2 x 5S 3600 mAh packs installed to acheive the desired CofG; this is most because I mounted the tail servos and receiver in the rear fuselage just behind the 'cabin' area. The front bulkhead only holds the moulded cowl in place, with a keyhole slot at the bottom as the screw would be tricky to reach; a self-tapping screw is permanently fitted to the cowl (for the keyway) and 2 tappers inserted at the top to secure it in place. I didn't bother to fit the standard motors rails for the latest power train; the motor is bolted to a piece of 1/8" birch ply secured with epoxy and 2 pieces of 10mm triangle section balsa to assist transferring the thrust to the fuselage. The plate is angled to the right as per the original rails for give the required side thrust. I cut away the 2 bulkheads in front of the cockpit to allow the batteries to slide in; this probably isn't needed for a single LiPo pack. I glues a couple of strips of liteply to the bottom of the holes in the bulkheads to guide the batteries through the bulkheads during installation.
I also made the tailwheel removable, simply with unscrewing 2 self-tapper screws in to an additional 1/8" birch ply plate. The plastic tailwheel pivot block has a central blade on the fuselage side so the ply plate is slotted to take this; leaving the blade on will improve stiffness a lot. The plastic fitting in the rudder of the Cub is the standard slotted type so the tailwheel just lifts out once unscrewed.
9 Jun 13 - I fitted the Emeter2 Remote Data Unit (RDU) for the first couple of flights today and also carried a logging altimeter for another flight. The RDU logs the voltage and current against time. The average power consumed during the flights was 190W (more aerobatic) and 150W (more sedate; the wattage graphs are here: flight 1 and flight 2. I also fitted a HobbyKing logging altimeter on another flight and the graph is available here.
16 May 13 - I flew the Cub on floats from Longham Reservoir today. I left the APC 13" x 7" propeller on and the Cub taxied and took off with no problems even with quite large ripples on the surface. The landing was equally uneventful as were several touch and goes. There is no point in increasing the power further as it copes more than adequately as is. It could be nice to reduce the weight further, which could be done with a built up wing; and fitting flaps could be a nice upgrade too. Mounting the battery packs further forwards would help and could allow considerably smaller packs to be used; however, I kind of like being able to do 3 flights of 10+ minutes with no concern about battery life.
31 Mar 13 - I have now finished the fitting of floats to the Cub, which can be swapped with the wheeled undercarriage very simply and quickly. Before flying in the float plane configuration I will test fly the Cub on wheels. I tested the new set-up this evening and got a healthy 500W, which is great when using wheels but might be a bit sluggish on floats. I'm tempted to fit an APC-E 14" x 7 propeller to increase the power for float flying; ground clearance might be an issue on wheels.
3 Mar 13 - I had to rebuild the nose after a little prang and decided to convert the Cub to brushless power whilst I did that. I also fitted a twin landing light in the wing leading edge, which run from a separate battery pack and an RC switch. I've also nearly finished a set of floats for a waterplane conversion. The weight has increased slightly due to the addition of the landing light.
6 Apr 07 - I decided to convert the Cub to LiPo power and as the power was more than adequate with the 16 NiMH cells decided that a 5S pack would suffice. The cells are mounted directly behind the motor and couldn't be moved forward much. This meant that the total pack weight would need to be around the same as the NiMH pack at 945g. I had bought 2 x 5S1P 20C 3700mAh packs to power the Mustang, which weigh around 465g each, giving a total of 930g. This would also give a total capacity of 7400mAh and a full throttle motor run of over 19 minutes. As the throttle can be reduce to about 1/2 stick the flight time would probably be in excess of 30 minutes. To allow the packs to to removed easily for charging I have fitted a hatch between the undercarriage blocks (picture above) and enlarged the battery bay as the packs are a little wider.
I have also remade the camera mount to suit my new Canon S-410 compact camera, which adds 250g (8.8 oz) to the model weight when fitted. The camera mount can be fitted in the belly as before or in the upper cabin shooting down the right wing as required. The banner towing release can still be used and adds 68g (2.4 oz) when fitted. In theory the camera and banner towing release can be fitted simultaneously if the camera is mounted in the upper position.
22 Jul 06 - I have finally got around to returning the Mega S9 to this model, and fitted 16 Sanyo RC-3300HV cells as a pack.
17 Aug 00 - Temporarily I have fitted a Megs S5 motor with APC 11" x 7" propeller on 12 cells to keep the model flying.
10 Aug 00 - I sent the motor away a short while ago as one of the balancing weights had come adrift. The motor was returned today with a new armature fitted by the maker at nil cost. This is the sort of service I really like and why Mega will be motor of choice in future.
25 Jul 00 - I have added a photograph of the camera mounting plate I made for the Cub. It sits in an aperture I left just behind the rear undercarriage wire (visible in the photograph). The shutter is directly operated by a servo using an extended output arm. The camera I am using is a cheap disposable camera that unfortunately doesn't have a motor wind-on facility. I therefore, at present, have to land between photographs to wind-on the camera. I intend to build an experimental winder for use with this set-up.
11 Jul 00 - I have slowly been adding optional parts to improve the scale appearance. Whilst these parts will not normally be fitted for general flying, they can quickly be added for scale competitions. The first addition is a mock-up of the undercarriage suspension system, whilst not functional it looks reasonable. I have also added the main wing bracing struts and will be adding the sub-struts before finishing them. All these options add drag and weight, which will reduce the flight time, but I can still achieve 15 minutes on 16 cells.
7 Jun 00 - The CEM2008 motor threw a magnet a while ago whilst bench testing my prototype variable pitch propeller. I decided I wanted to be able to improve the performance and ended up buying a Mega S9 motor. This motor will handle up to 35A and 24 cells (at the same time). It is also a slow revving motor with bags of torque swinging a 13" x 7" propeller at up to 9500 rpm. I have temporarily fitted 16 cells to be made more permanent when I get around to it. I will also be adding the option to fit an additional 4 or 8 cells to boost performance. This additional performance will be used for glider towing and in the float plane role (when I finish the floats).
5 Jul 00 - I completed the larger banner, which is 12" wide and just over 12' long, which is a scale size of 6' high by 75' long. After work today I managed to fly with the new banner and the model requires significantly more power than for the small banner. Despite this it still copes very well with plenty of power in reserve.
1 Jul 00 - This week I made the wing-fuselage struts from 3/16" x 1/2" (5mm x 12mm) hard balsa, sanded to a symmetrical aerofoil shape. I also made a camera baseplate to hold one of the cheap disposable cameras. The cameras do not have motor wind, so at present it is a single shot device. I plan to make an external winder to allow multiple shots. I also made a backplate with a cable release to allow banner towing & possibly glider towing. Both the camera and towing plates fit in the same gap I built into the bottom of the fuselage. I first flew the model with the camera & towing plates yesterday and no major problems were found. The only slight problem was that the plane was more unstable in yaw on the ground, but fine in flight. I flew it with a very small banner approximately 8" x 30" (200mm x 760mm), which equates to a scale size of 4' x 15' (1.2m x 4.6m). In future I will probably make a large banner equivalent a scale size of 5' x 50' (1.5m x 15.2m).
16 Jan 99 - This morning I cut the tissue from the open areas of the fuselage and wing tips and replaced it with Profilm. The main reason for doing this was the poor impact resistance of the tissue, and numerous cuts & holes that occurred when I moved the model to my new house. There is no noticeable weight change but it stop me having to frequently fix the tissue.
30 Sep 98 - After a short 5 minute flight on 19 Sep 98 the speed controller stopped working & I am returning it the dealer for investigation. The failure was unusual as one minute it was working fine. The next time I throttled up it didn't give power to the motor. The ESC was replaced, free of charge, by Ripmax as the FETs were faulty. I have refitted the ESC and flown the model since. I have found a picture of a Cub float plane which is basically white (luckily) with some red trim and metal floats (silver). I must now start the paint detailing and fitting of a little scale detail.
During Build - I have fitted an external charging facility for the motor and RX batteries. As a safety precaution the main fuse can be removed through the fuselage side. The wings are veneered white foam and the fuselage Liteply and balsa. The model is covered with tissue applied with watered down PVA glue. The open areas are shrunk with dope. The whole model has been sprayed white and when test flown will be finished in the colours of a UK registered Piper Cub. I have now completed a few flights on the Cub and will be adding the 'scale' detailing in the near future. I incorporated the wing mounts for a set of struts to improved the appearance and will be making them in the near future. I also purchased the Flair sport float set and have started to construct them. I will be taking my time for the moment as I don't have anywhere suitable to fly from at the moment.